Getting started with Cypress - a modern frontend testing framework Setting it up, stubbing API calls & get it up and running on your CI
Cypress is a new, open source integration test runner for modern JS applications (its development is sponsored by their online dashboard that allows you to record test-runs). It doesn’t require setting up Selenium, or other browser plugin, manually. Add it to your package.json and everything you need will be set up:
npm install cypress --save-dev
You can open even a GUI using:
./node_modules/.bin/cypress open
Alternatively, you can run the tests headless using the run command:
./node_modules/.bin/cypress run
Running the test will leave you with video recordings of what has been happening visually on the frontend for further review.
Ok. All nice, but you’re right, these are tests running against a locally run server. So let’s move the examples directory out of scope of the test runner:
mv cypress/integration/examples cypress/integration-examples
(when exploring a new framework, I typically like to keep the examples around for inspiration)
Also, make sure the following lines are added to your project’s .gitignore file, video’s and the examples don’t belong into your project’s repository:
cypress/integration-examples
cypress/videos
cypress/screenshots
Now create a new integration directory and start writing our first integration test:
mkdir cypress/integration/examples
mate cypress/integration/examples/start-page.spec.js
Getting started with a local project
You typically want to separate your development environment from your testing environment. Development environments may be configured to access remote services and more things that you might want to prevent in testing.
So while you can visit your local dev environment, before each test, as below, it makes sense to change this a bit.
/// <reference types="Cypress" />

context('Assertions', () => {
  beforeEach(() => {
    cy.visit('http://localhost:3000')
  })
});
We’re going to make a custom task in package.json to make things easier:
You probably have a scripts-section in your package.json, add this line to enable a command like npm run cypress to work (assuming you start a local server using npm run start, if not, you probably know what should be there):
"cypress": "NODE_ENV=test npm run start & node_modules/.bin/cypress run && NODE_ENV=test npm run stop",
Make sure that your server runs on a different port when process.env.NODE_ENV === 'test' so you can keep your development instance running (beyond the scope of this article).
Now remember that port (i settled on 3123) for now (maybe you should read it from some config but I’ll skip that for now (and ever?)) and fix the beforeEach:
/// <reference types="Cypress" />

context('Assertions', () => {
  beforeEach(() => {
    cy.visit('http://localhost:3123')
  })
});
run it:
$npm run test
…
All specs passed!                             3ms        -        -        -        -        -
Yeah. Only, we have 0 tests.
Note to myself: My webpack-dev-server in the test-NODE_ENV actually keeps running after I ran the test. Because Gitlab’s CI runner seems to quit on any exit signal, I don’t have a huge issue with this, but this might be something to fix later on.
The first real test
Your application needs to run, and probably has a home screen, so let’s check whether the right information is present.
/// <reference types="Cypress" />

context('Assertions', () => {
  beforeEach(() => {
    cy.visit('https://localhost:3999')
  })

  describe('Home page', () => {
    it ('should have a title', () => {
      cy.get("h1").should('contain', 'Wrong title')
    })
  });
});
Now, I explicitly made a bad assumption here, because I discovered that while running the tests only in the command line lets you miss out on a great feature of the GUI test runner. It is great that Cypress allows you to run the test headless, but don’t run Cypress headless when writing tests; Cypress will automatically rerun the test after saving it, respond immediately to changes, allows you to step back and forth, and explore the intermediate steps visually.
To make opening Cyprus easier this, I added a cypress:open command to my package.json scripts-section:
"cypress:open": "NODE_ENV=test npm run start & node_modules/.bin/cypress open",
Now, run npm run cypress:open and start the tests from there (make sure you actually select a browser installed on your system, not the Electron ‘headless’ browser).
Now change your test:
-      cy.get("h1").should('contain', 'Wrong title')
+      cy.get("h1").should('contain', 'Correct title')
Your Chromium-based browser window will feature more green.
Double check in your Terminal: npm run cypress:
All specs passed! 00:02
👍
Stubbing API responses
The frontend in my case is basically showing the login page when no valid API response is returned. To get to the logged-in state I need a valid response from the server, which polls /api/v1/auth/info/ for user data. This requires a bit more set up before testing.
Set up a fixture
The fixtures directory is already present (cypress/fixtures), simply place what for your project is an appropriate response to an API call.
Stub the call
Here, I found out the hard way, it gets trickier, since Cypress doesn’t know how to stub fetch calls yet, and in modern JavaScript you’re probably using fetch over the older XMLHttpRequest.. While you could use a recorder library such as PollyJS or Talkback, I decided it was easier to stick closer to the Cypress server solution and simply use [`unfetch`](https://www.npmjs.com/package/unfetch) that allows you to undo the browser’s fetch implementation and reroute it via the older [XMLHttpRequest](https://developer.mozilla.org/nl/docs/Web/API/XMLHttpRequest), which Cyprus does support.… which was a bad mistake (I even tried stubbing the fetch method myself, also not a good idea). PollyJS worked for me, probably because they offer a closer replica of the native fetch-method:
npm install @pollyjs/core -D
npm install @pollyjs/adapter-fetch -D
We can now write the test (I will explain it below the code)
/// <reference types="Cypress" />
import { Polly } from '@pollyjs/core';
import FetchAdapter from '@pollyjs/adapter-fetch';
Polly.register(FetchAdapter);
context('Assertions', () => {
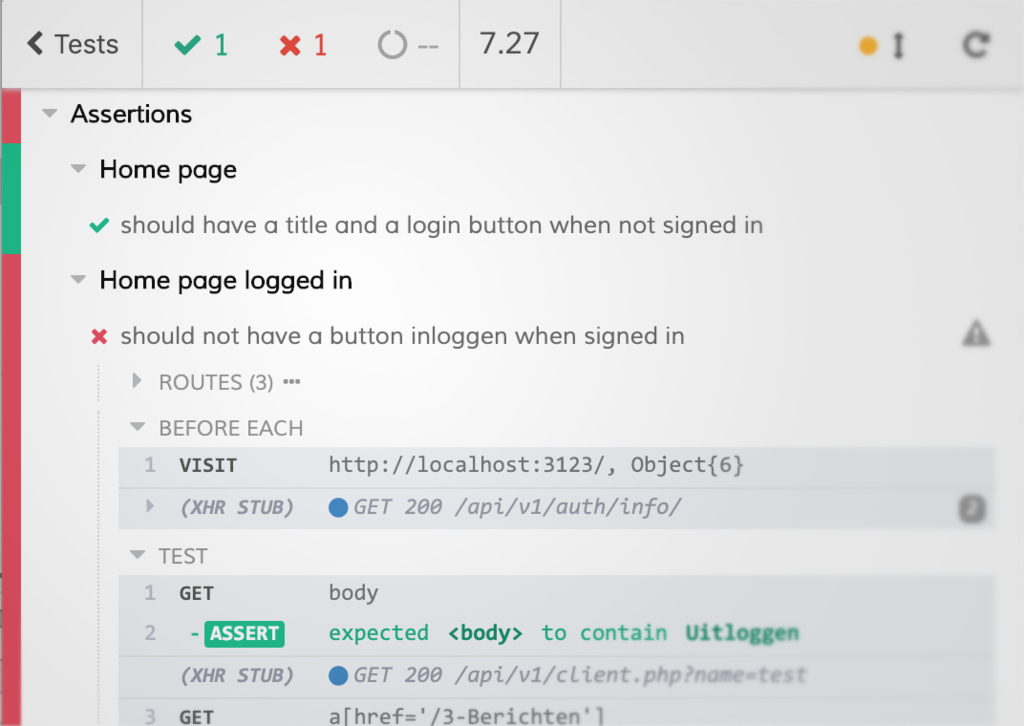
describe('Home page logged in', () => {
beforeEach(function () {
cy.visit('http://localhost:3123/', {onBeforeLoad: (win) => {
win.fetch = new Polly('<Recording Name>', {
adapters: ['fetch']
}).adapters["fetch"];
}})
cy.server()
cy.route('GET', 'http://localhost:3123/api/v1/auth/info/', 'fixture:auth_info.json')
})
it ('should not have a sign out link when signed in', () => {
cy.get("body").should('contain', 'Log out')
cy.get("a[href='/messages']").click()
})
});
})
Ok. I’m not very happy with that code, but I guess this is the best we can do for now.
What’s happening here? First we import and set up the Polly package. Then, and that is the what I find the uglier part, we visit the start page in a beforeEach function. We do this because we need to set up the requested paths that need to be intercepted, and the alternative fetch implementation from PollyJS before each test. Since we’re basically clicking through a “Single Page App”, this is not a very big deal, but an accidental cy.visit("/"), which is absolutely nothing ordinary, would break this set up as it invokes a new page load.
Alternative to stubbing the fetch-commands from a server is actually starting a test server simultaneously, as suggested by the creators of Cypress. And they are right, it would make for a more complete integration test, but maintaining a whole test suite running through so many layers is hard (besides making running your tests also much slower).
Get it up running in your CI environment.
When you’ve got your first tests working, you want to make sure the tests are continuously run. The docs actually have a good entry on CI, but as a minimalist I don’t like to overdo it with things like parallel testing and what else.
I started extending my own template, but there are a few minor caveats. Cypress needs some system dependencies you may not have. For your convenience, if you’re currently using the standard node docker images in your CI, you can use the cypress/base docker images. Alternatively add the dependencies to your own image. Finally, to get it to work completely on Gitlab, I had to explicitly set the Cypress installer to use the project CI’s home folder for its cache. This is what a minimal .gitlab-ci file could look like:
image: cypress/base:8

stages:
  - build
  - testing

variables:
  npm_config_cache: "$CI_PROJECT_DIR/.npm"
  CYPRESS_CACHE_FOLDER: "$CI_PROJECT_DIR/cache/Cypress"

cache:
  key: ${CI_COMMIT_REF_SLUG}
  paths:
    - .npm
    - cache/Cypress
    - node_modules

install:
  stage: build
  script:
    - npm install

Unit tests:
  stage: testing
  script:
    - npm run test

Integration tests:
  stage: testing
  script:
    - npm run cypress
That’s it
I wanted to do a small test for myself on a real project and document it properly here. You’ve just read it.
The 👎:
- Cypress only runs against Chromium/Chrome browsers at this moment. The headless browser included is an Electron-browser, which ~= /Chromium/… they’re working on Firefox & IE11 support though (for a bit too long already, which might make one concerned about whether it will ever launch for real)
- No good support for
fetchyet. It took me hours to figure out how to get it working, often left in the blue without proper error messages and just a timeout on the test
The 👍, however:
- I never thought getting it up and running was so quick
- I really never ever would’ve thought getting the CI runner up so quickly.
- Besides a proper command line interface, a great UI that makes debugging easy.
- Looking forward to finally start using things like a virtual differ…
The support for fetch should be a high priority. For me, PollyJS worked great, maybe the Cypress-team should just adopt it. But overall: I really recommend checking Cypress out!